Posts

Showing posts from 2022

Update Feature - 1

Image
  In Previous topic we have looked in Delete Functionality and integrated both UI and JAVA and on click of Delete button we showing message in header if it is success. In this topic we will work on update functionality, let's start and update our code as below : First we have to update our todos-list.component.html and add a column for update, we will remove action column and change it to update and delete columns. Your page will look as below: Now we have to create a updateTodo method in todos-list.component.ts file and from this method we want to open a new page where we update the details. so for opening a new page we have create a component so create a component with ng generate component todo as shown below  If you remember from some of the starting topic we have added new component to app-routing.module.ts file. we have to do this because we are routing to another page when we click on update button. Now create updateTodo method which will route to the edit page so for routi

Delete Feature

Image
In Previous Topic we have refactor our Angular and JAVA code a little bit, so that all API's URL will be at same place and also updated Cross Origin at root level. In this topic we will implement delete functionality to our todoList Application. So starting with java change let create a DeleteMapping which will take username and id as parameter and we will delete data based on Id. we will use remove method for removing it from List, so for that we have to generate hashCode and equals method for variable Id in TodoResponse POJO Class. So make the code change as below: 1. RestWebserviceApplication.java 2. TodoController.java 3. HardcodedTodoService.java 4. HardcodedTodoServiceImpl.java 5. TodoResponse.java After all the change you can test it by using chrome extension  "Talend API Tester"  Once you hit on send you can check if its deleted or not by going to http://localhost:8080/users/dummy/todos you can see 102 id is not available Integrating this Delete API with Angular A

Refactoring Angular and Java Application code

Image
  In This topic we will refactor our code for better readability. Refactor JAVA Code : Let's start with JAVA Code so you can see in previous few topic we have added cross origin annotation in each controller to call API from Angular application. what will happen if you have lots of Controller then there will a chance we miss adding it. So what we will do ? For now we will add a bean in  RestWebserviceApplication.class which will handle cross origin. We are going to use WebMvcConfigurer and will override addCorsMappings as per our project needs. WebMvcConfigurer : It is an Interface which is used to customized JAVA Configuration for spring MVC enabled project. addCorsMappings/ CorsRegistry   : It is a default method provided by  WebMvcConfigurer to configure global cross origin request. Update your code as shown below and once you add this you can remove CrossOrigin annotation from Controller class.  Check from UI if your application is working fine after this change. Refactor Angul

Retrieve Todo List and Integration with UI

Image
  In Previous few topic's we have created our java application and tried to connect JAVA service to Angular and we found when we click on button's our java API is getting called. we saw the use of HTTP client modules. In this topic we will start working on our todoList Application and create JAVA Services for below points: Retrieve all the todo list. Creating a todo Editing a todo Deleting a todo Before this quickly move HelloWorldController.class and HelloWorldBean.class into a new package : package com.learnangularwithjava.restwebservice.helloworld as shown below the project structure: Now create a new package com.learnangularwithjava.restwebservice.todoresources and create a new class TodoController.class in it. please see below screen shot of code. Note: Add @CrossOrigin(origins = "http://localhost:4200/")  Now once the code is done start your service by running RestWebserviceApplication.class and hit this URL http://localhost:8080/users/dummy/todos you will see b

Error Response and use of Path Variable

Image
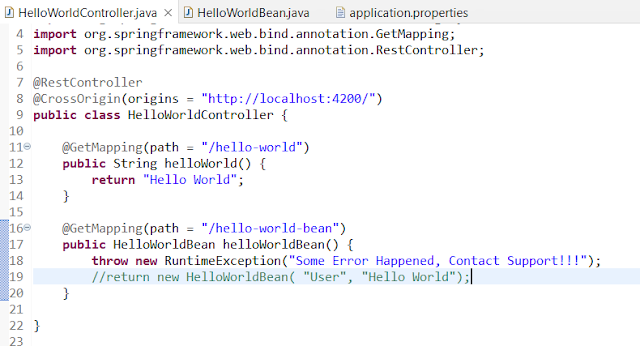
  In previous topic we have integrated our java service with angular service and seen when clicking on welcome button our java API is getting called and success message is returned, in this article we will use the same JAVA method to return Runtime error and we will map this error using subscriber in angular application. let's start with updating our java API /hello-world-bean as below :  Now update your welcome.component.ts as below :  Now Refresh your page and click on button you can see the error response is coming as below:  Now we quickly add one more method in JAVA which take input from UI and return that from JAVA in response. Now add a method in HelloWorldController.java class as below, in this we are using path variable to take input. @PathVariable Annotation which indicates that a method parameter should be bound to a URI template variable. After adding this update your UI Code as Below:  Now refresh you page you will see below result when you click on welcome user name b