Hello World Service, Dispatcher Servlet and Auto Configuration
In Previous topic we have installed eclipse and created on rest-webservice also we have seen our service was started with default port 8080 on default tomcat server.
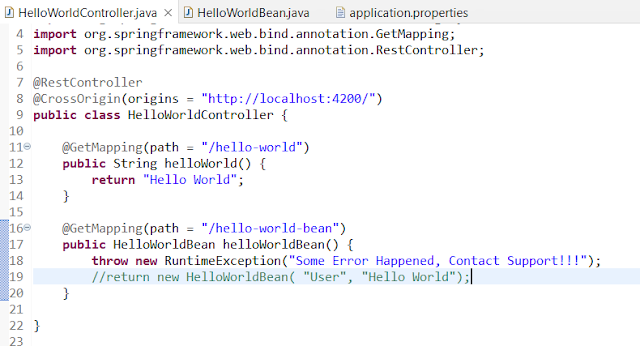
Let's create one Hello World service and we will simple return hello world as a string as well we will return a POJO from our service. For this let's crate one controller class as HelloWorldController.class, first we need to tell spring that this class is controller class as we are working on rest application we can use @RestController annotation on this class.
RestController is used for making restful web services with the help of the @RestController annotation. This annotation is used at the class level and allows the class to handle the requests made by the client or user.
Let's create one method in controller class which will return String once created then we need to specify the mapping type of this method like whether it is a get request or post or any other. Here we are only returning a String so we can use @GetMapping.
@GetMapping is a composed annotation that acts as a shortcut for @RequestMapping(method = RequestMethod.GET)
example : @GetMapping(path = "/hello-world") so when user click on http://localhost:8080/hello-world it will return a string.

Here you can see i have create a method helloWorldBean and the return type of this method is a bean class we are injecting the value using setter injection.
HelloWordBean class is a simple POJO class with setter and getter and toString.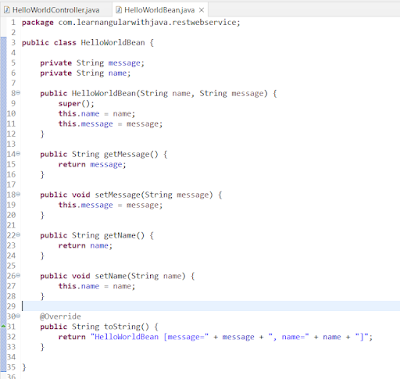
Now if you check the http://localhost:8080/hello-world-bean you will it is return a JSON response.
Now if you check the http://localhost:8080/hello-world-bean you will it is return a JSON response.

You may have questions now that how a bean is converted to JSON only? What is dispatcherServlet and what it will do? how error is configured?
To look into the answer add logging condition in application.properties.
logging.level.org.springframework = debug now start your application, you will see there is a lot of log present in console.
In Logs you will see Condition evaluation report

in Positive match you can see DispatcherServletAutoConfiguration matched and it says it found the DispatcherServlet class in the class path. This is because we have added dependency of starter web in pom.xml and springboot starter web is having a dependency on spring web mvc and DispatcherServletAutoConfiguration is configured.

Next you can see there is ErrorMvcAutoConfiguration so it will configure error page also, in ErrorMvcAutoConfiguration there is WhitelabelErrorViewConfiguration so we can generate this in our code for that remove the getter from HelloWorldBean class.

Now refresh your page you can see white label Error


So we can say that all these configuration is activated because of springboot auto configuration, it will look all the class, jars which are present in the classpath it it tries to auto configure those things.
Dispatcher Servlet :
If you look into the logs you will find initializing dispatcher servlet to [/], so it means dispatcher servlet is handling all the request and dispatcher servlet is the front controller spring web application.
So when we go to any URL what will happen the request will go to dispatcher Servlet and dispatcher servlet knows all the mapping present in application. so when a request came to dispatcher servlet it determine which is the right controller for that request and call that particular controller.
So when we got to http://localhost:8080/hello-world-bean you can see in below logs that dispatcher servlet is picking the right controller and right method to execute.
and for transforming the Bean into JSON Format : As we have use @RestController annotation on our controller class and @RestController is having @ResponseBody annotation it will transform the bean in JSON format as shown in logs below


Comments
Post a Comment