Posts

Showing posts with the label visual studio code

Error Response and use of Path Variable

Image
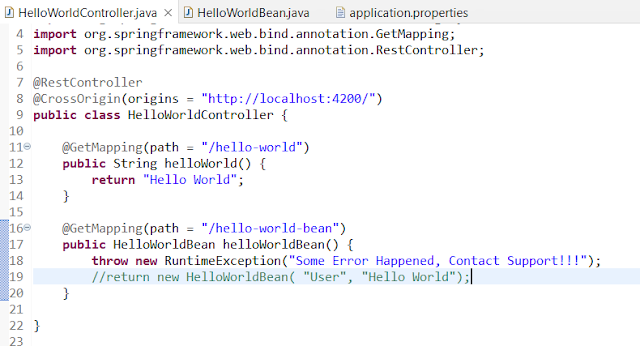
  In previous topic we have integrated our java service with angular service and seen when clicking on welcome button our java API is getting called and success message is returned, in this article we will use the same JAVA method to return Runtime error and we will map this error using subscriber in angular application. let's start with updating our java API /hello-world-bean as below :  Now update your welcome.component.ts as below :  Now Refresh your page and click on button you can see the error response is coming as below:  Now we quickly add one more method in JAVA which take input from UI and return that from JAVA in response. Now add a method in HelloWorldController.java class as below, in this we are using path variable to take input. @PathVariable Annotation which indicates that a method parameter should be bound to a URI template variable. After adding this update your UI Code as Below:  Now refresh you page you will see below result when you click on welcome user name b

Logout Component and Angular Router (CanActivate)

Image
  In this topic we will create our logout component for our application and also remove session object if user is logged out as well we will see the use of Angular Router method CanActivate. Now Let's create logout component using command "ng generate component logout"  once you create the logout component you have to add it in routing file i.e. app-routing.module.ts and add it before ** as ** will be the last thing in routing. After adding it here you can check it by clicking on logout button in your localhost URL. Now we will remove user from session storage for that we need to add one method in authentication service and use that method in logout component by dependency Injection. Till Now we have done the login, menu, error, logout so you can check it by going through localhost. but still we have one problem i.e. if we go to http://localhost:4200/welcome/dummy or todo or any menu item without logged in it is working so what do we need to do here? we need something whi

Authentication and Session Storage

Image
In this topic we will create our authentication service, use session storage and we will enable menu links based on user authentication. Let's create a service by using command "ng generate service foldername/servicefilename", always create services in a folder otherwise it will create everything in src folder and it is very difficult to track it. Now create our authentication service so the command will be "ng generate service service/hardcodedAuthentication", make sure you are in the project folder when you use the command. as shown below When you open this service file you can see it is a simple class except @Injectable,  it make this class as service and we can use this at any place of or project by importing it. Injectable make a class available for dependency injection Now add some method in this class. Now we use this Authentication service in our login component, for using this we have to add this in constructor  and now as we move the authentication par

Header, Menu and Footer Component with CSS

Image
In Previous topic we have learned angular modules and bootstrap. In this topic we will create menu and footer component for our todoList application and add some bootstrap css in it. So let's create our menu and footer component by using command "ng generate component menu",  "ng generate component header"   and "ng generate component footer" using command prompt at your project location as below: once these component are created add some hardcoded value in html files for all and then you have to add the tag name for header, menu and footer component in root component i.e. app.component.html as below and refresh your localhost. Menu Component: Now we will look into Menu Component and some link for login, logout, todos and other. For this we need to update our menu.component.html file as below, we will use router link for routing from one page to another and href for external URL. Header Component: target="_blank" will open the link in new tab

Angular Modules, Bootstrap

Image
in Previous topic we have created our todo List for our Application, Now we can learn some concept about angular modules. Whenever we talk about angular application they are build on multiple angular modules. So you can say an angular module is a group of components, services, directives. Some of built-in modules in angular framework are BrowserModule, FormsModule, AppRoutingModule, NgModule. Whenever we want to use any angular feature we have to import that module. Like in our LoginComponent html we have used ngModel and for using ngModel we have imported FormsModule, so whenever we want to use any built-in feature of angular we need to import there corresponding modules. So we can think angular application as a group of angular modules, and each component or directives that we have created till now like LoginComponent, ErrorComponent, WelcomeComponent, todosListComponent are always associated with angular module. The Syntax for angular module will start from '@' i.e. @NgModul

Create My Todo List

Image
In this topic we will create one todo component for our todo list and route it from welcome component we will use some angular directive. Lets create one todo component using command "ng generate component todosList"  Once created lets add it to route and route is present in app-routing.module.ts always add new route before ** route as ordering is important in angular.  If you put ** above, and you put the new route down below it, what would happen is this ** would  match the component route so because that would match anything, it's a regular expression to match anything and we end up in error page. Now we will add some list in todo list component, for that the best practice is to create class in typescript file as we know typescript file is javascript module and we can have any number of class in it. Now create a todosList class and add a constructor with some parameter and these parameter must be public. Here you can see we have created a list of todos and we need to s

Implementing Routes

Image
In previous topic we have created our login page and added validation, in this topic we will cover routing in angular when user click on login button they will route to welcome page or error page. If you remember when we create our project using "ng new" command there were some question asked i.e. do we need routing and we said Yes and then we got one file app-routing.module.ts so this is the module which will handle all the routing in our application. All the routes are configured under " const routes : Routes = [];" First we need to create our welcome and error components for that we can use command "ng generate component welcome"   and "ng generate component error". After generating these components now we will configure routings. in app-routing.module.ts need to add below code: const routes : Routes = [ { path : 'login' , component : LoginComponent } ]; It means path will be http://localhost:4200/login and which component i